Zen Squirrel Blog

Steps to a Strong Handstand
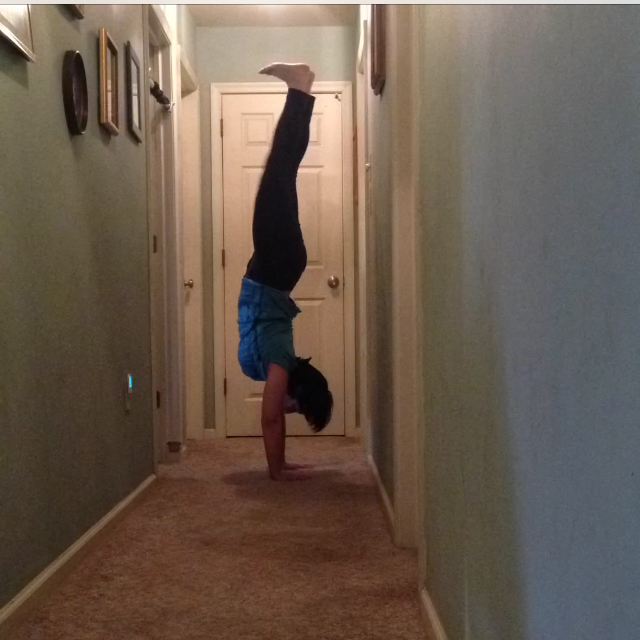

I'm still a student as well as a teacher. This was held briefly!
Handstand is a beautiful pose that is a mental and physical challenge for many of us. Evaluating and working on a few key areas might make handstands and other inversions more accessible. This post will explore foundation, core and hamstrings. Take a few sun salutations to warm up, and then start with these poses.
Foundation - Strong arms and shoulders are a must for handstand.
- From Downward Facing Dog, bring your shoulders over your wrists. Walk your feet in until you are in a shortened version of the pose. Stand up high on your toes, lifting your hips. Keep a firm core by pulling the belly button in and toward your head. Pause here for several breaths and repeat, or go on to step 2.
- Once you are feeling strong in your shortened Downward Facing Dog, try elevating your feet on a chair or against the wall until you make and upside down L shape. You may want to time yourself and work on holding the poses for longer periods of time as you gain strength.
Core - If your goal is handstand, there is nothing like some good old fashioned core work to get you there.
- Breath of fire – I like to take this in a seated position. The breath should move quickly, but you can keep it slow until it becomes a little more comfortable. Keep tissues nearby if you are congested. With your mouth closed, quickly and firmly pull your belly button toward your spine to force an exhale out of your nose. Relax and allow the inhale to come naturally. Repeat the process for several breaths. It may help to place your hand on your lower belly to feel where the exhale is coming from. I started with 3 sets of 50 breaths, but please adjust the length of your practice as necessary.
- Boat pose - From a seated position, bend your knees and place your feet flat on the floor. Place your hands behind your legs, and balance on your sit bones. Keep a long spine, and lift your legs until they are parallel to the earth. Stop here, or float your arms parallel to the ground. If it is difficult to avoid rounding your back, stop here, otherwise, you may straighten your legs for the full pose. In this case, you'll look like the letter "V". Start with 3 sets of 5 breaths and work up as you gain strength. Favor quality over quantity.
- Plank variation - No mat is needed here, just a blanket and a hard, slippery floor. Start at the top of a pushup position with your feet in socks or on a blanket. Attempt to pull your feet toward your hands and your hips in the air. If you don’t get very far, that is fine, just keep making the effort. If you end up in or near a forward fold, push slowly back to plank and repeat several times.
- Block Plank – From plank, squeeze a yoga block between your ankles, and feel the way this changes your core engagement. Keep your spine long by reaching your head toward the front of your mat and your heels back. Bring the same energy to your handstands, and watch yourself become more stable.
Hamstrings - Flexibility in your hamstrings will make it easier to move your hips over your shoulders with control. If you have tight hamstrings, this may be the area that needs extra attention.
- Wide Legged Forward Fold - Bring your feet to the width of your outstretched arms, parallel to the side of your mat. Bring your hands to your hip creases, and extend your spine long. Slowly move toward a half fold, bending from your hips. If you're very tight, you may want to stop here or soften your knees before continuing. If you’re moving on, keep bending from the hips (not the low back), and extend your head toward the ground. Lift the sit bones and ground through your heels to lengthen your hamstrings.
- Half Hanumanasana - from a low lunge, bring the back knee to the ground. Move your hips over your back knee, and straighten the front leg (toes up and heel on the ground). You can bring your hands to the floor if you can do so without rounding your back, otherwise use blocks. If you aren't feeling a stretch yet, you may move into the full version of the pose.
Conclusion - A strong foundation (arms and shoulders), strong core, and flexibility in your hamstrings can make handstands much more accessible. This type of practice has been making handstands feel more comfortable to me. Wherever you are, enjoy the practice. You'll learn something about yourself during the journey, even if you never reach the full pose.

Challenge day 4

Day 4 is L handstand against the wall. Sometimes this can feel even harder than kicking up to a wall.

Start out on your hands and knees with your feet against a wall. Push up to a shortened downdog, heels on the wall. Stay here or walk your feet up the wall and straighten your legs. Your hips will stack over your shoulders and wrists. Keep your core strong. It is normal to feel like your hips are beyond your hands when they aren't.

How I Learned Non Attachment in Handstand

Our practice often speaks so much about our mental state, we just need to take the time to listen. Several months ago, I was pretty excited about handstands. I was practicing them regularly, and felt fairly strong. I attempted to move slowly away from the wall, felt myself shifting off balance and knew I should come down. Instead, I was attached to the result of nailing that handstand for a few more moments and tried to correct myself. Down I came with a loud crash, hyperextending my wrist, and leaving one nasty mat burn (like a rug burn, only worse) on my shoulder. My body hurt, and my pride was crushed.
In the months that followed, I became well aquainted with the basics. I learned that instead of becoming totally wrapped up in attaining full wheel pose (impossible with my wrist injury), I could explore the subtle actions that are available in bridge, and I loved it. I learned that a chair assisted wheel feels amazing, and opens up my heart center in a whole new way. Due to my injury, listening to my body and becoming less attached to achieving some final result became a necessity.
Time has gone by, and I just finished a handstand workshop at a local expo. Fears came up as I was asked to trust my assistant (not the wall) and turn my world upsidedown. Things went better when I stopped thinking about the final result, and really invested myself in the present moment. I noticed subtle things like my gaze and the action of the muscles in my inner ankles and wrists. It played a big part in my comfort in the pose. Most of all, I was able to lose the attachment to the result and enjoy the moment. A yoga practice is really about what you learn about yourself and how you feel. While I may not be bearing weight on my hands unassisted, I learned to become more comfortable in a difficult situation. This is worth way more than any handstand ever!
“Do your practice and all is coming.”
Namaste - Beth